Showing posts with label cake. Show all posts

Friday, June 24, 2011

Cake Final Exam

I needed an inspiration for my final cake design.  I wasn't really feeling the example designs out of our instruction book, they were a little too old-school for me.  I actually had a birthday to bake for that Monday, but I didn't want to give him a cake a day late.  And I already had a different inspiration for a treat for him (which turned out very yummy btw).  So I was really excited when I found out one of my friends at work was going to find out the gender of thing growing inside of her the Friday before.  Now we don't have to call it a thing anymore!  It's going to be a beautiful bouncing baby boy.  I spent some time over the weekend coming up with this design and was pretty nervous about how well I was going to be able to execute it at class because I wanted it to be perfect for her.

The first part of class we practiced writing and making Wilton roses.  Writing actually turned out to be kinda fun and easy.  The first time I tried it on my leftover cookies I was missing a very important trick - add a bit of piping gel to your frosting to help make it smoother and easier to squeeze.  It was fun but a little tricky practicing on the practice board because I'm not used to writing in cursive at all!  For some reason it felt fairly natural when writing in frosting though.  I'm definitely not as scared of it as I was before and no long *quite* as impressed with the beautiful writing I see on the standard cakes at every grocery store.  The roses were also pretty cute and easy as soon as you know the behind-the-scenes secrets.  After learning each step the mystery was revealed and I soon had my first frosting rose!  I wish I had a picture of it.  It definitely wasn't perfect but what rose in nature is?  It looked real with all it's little imperfections!  I need to make some more practice ones soon before I forget the technique.  Anybody want a cake full of random roses? :)

Finally it was on to the main event - implementing the design on my cake that I literally dreamed about the night before.  I had brought with a printout of the outline of my design and tried the technique we had learned the first week with using piping gel to transfer it on to the cake.  Unfortunately this was just full of fail.  I couldn't see the lines at all.  I think if I try this again at home I'll try coloring the gel slightly so it stands out better.  But I forged ahead - freehand!  I thought for sure I was doomed.  Who thought it would be a good idea to try to freehand multiple perfect circles and straight lines?  I don't think I did too bad...

My final - I passed! :)

I wasn't super happy with the writing, but the rattle turned out pretty cute.  The picture below is before I added the yellow dots for a finishing touch...I definitely didn't decide to do them to cover up any imperfections there may have been in the white icing.  No no, not at all.


The colors came out so cute!  I had a really hard time with the brown and wanted to give up more than once.  I started with "brown" but it was very very light and not what I wanted at all.  So I added a bit of black to darken it up but that gave it a charcoal gray affect.  I added some red to brighten it up which did absolutely nothing.  Finally I poured in red, blue and green and mixed vigorously and to my surprise I got the perfect dark chocolate brown that I was looking for!  Not too shabby for my second cake and first original design. 

I tried to do the same border I wanted to do on my first cake.  The first round I plopped onto the cake turned out terrible so I finally asked the instructor for help.  She showed me on my practice board and then I was like oh yeah...the practice board!  I did a few lines for practice and then wiped off the mess I made before.  I could never quite get it exactly like I wanted, but it turned out wayyyy better than the first time!


Oh and my coworkers loved it.  Everyone took a moment to admire it before letting anyone cut in :)

Monday, May 30, 2011

Session 2: Real cake!

Cupcake on top of my first cake
Right away the second week we were to bake a cake and bring it to class to level, split, fill, ice and decorate. This was all very intimidating to me especially after the day I'd had. I had been in Des Moines for my nephew's baptism so Monday morning I had to get up and drive almost three and a half hours back home. Then start laundry, run to the grocery store, and come home and bake a cake. Oh...and last but not least whip up my first double batch of Wilton buttercream frosting...phew! By the time class rolled around I was pretty pooped already. Now I had to try my hand at icing and decorating in not only a room full of strangers, but a whole store! We took the classes at Jo-Ann Fabrics in Apple Valley which apparently doesn't have a separate room for classes, so we were out in the middle of everything. We had more than a few wandering onlookers each week.

This week we got a few more tips and bags dirty.  The first tip we were supposed to use was 18, which in the craziness of my day I managed to leave in the little cubby of my dish drying rack but thankfully my friend let me borrow her tip 16 which is pretty close.  We practiced curving lines, zig zags, dots and "dimensional decorating".  I have to admit - the practice board that comes with the kit is the best invention ever.  I had seen it many times in the store before and thought it was silly, but I was completely wrong!  You can screw up as many times as you need to until you get the hang of it.  Just wipe the board clean and try again!  Definitely better than messing up a cake because you have no idea what you're doing. Speaking of messing things up because I thought I'd try something on my own...


...yeah, my border didn't turn out so hot.  I thought the one in the picture looked sweet so I tried it out.  (Hint: theirs does not look anything like that.)  For decorations that night we had our choice of the cupcake, a fish or a hamburger.  My nephew told me to do the cupcake so that's the one I went for.  I really dug the idea of the gel piping transfer.  If you have a basic outline of the shape/design you want to do, just print it out and flip it over.  Then take some piping gel and trace the outline on the back.  Then flip it back right side up and gently set it down in the middle of your cake.  Run your finger over the paper and your design is now on your cake ready to be filled in!  Pretty neat.  For the inside of the cake, the first week our instructor used one pudding Snack Pack.  Since I already had enough to worry about with baking the cake and making the frosting, I thought this sounded like a grand idea.  Unfortunately it turns out one pack really isn't enough...I could hardly tell there was anything in there.  If I decide to do that again I will definitely use two!

Oh and yes I did bake the cake from scratch and even though I made not have done a perfect job decorating it still tasted great!  Recipe to follow in another entry...stay tuned :)

Sunday, November 21, 2010

Eating an Identity Crisis

For about the last year and a half the project I've been working on is for a client out in Boston. We finally went out there a couple weeks ago to do on-site training and implementation. The clients were nice enough to provide muffins and other goodies throughout the day and in the morning I helped myself to what looked like a Boston Cream Pie muffin. They raved about how good these muffins are and how we wouldn't be able to get anything like them back in Minnesota. Well, I didn't think mine was that great. In fact, I didn't really like it at all and was glad I only took half. It had some weird flavoring that I wasn't expecting (orange flavored custard?). So after a long day of training and an awesome but not quite satisfying dinner, we went in search of dessert. On a dark, cold and rainy night we were lucky enough to wander into Quincy Market which was lined with various restaurants and bakeries. After walking up and down the aisle checking every place out, we finally picked out a couple creamy pies and sat down with forks at the ready. Only to be disappointed again. It was at least better than the muffin; the custard was pretty tasty. But there wasn't enough of it and the cake wasn't very flavorful. I guess that's what you get when you buy something that's probably been sitting out on a shelf all day.

I didn't get my craving satisfied while I was out in Boston, so I decided to satisfy it myself in my own kitchen. I've actually had this recipe for at least a year now, thinking I would make it when the project was over. Well, it's pretty close to being over now (crossing my fingers) so I thought it was finally time to celebrate. It took me almost all day on Sunday to make (scratch-made yellow cake, scratch-made chocolate cake, vanilla-rum custard, chocolate glaze, and assembly) and I was so worn out by the end of the day that I ended up having cold waffles for dinner (homemade buttermilk waffles that I had made the day before, don't worry they weren't frozen Eggos). It was all completely worth it though, especially getting to share it with everyone at work. I brought it in and everyone was so excited that I had made cake. But, I said, it's not a cake - it's a pie! Or is it a pie-cake? One thing is for sure, it was absolutely delicious!  And it's the least I could do to say a big Thank You for all the hard work everyone has put in.

Unfortunately I got this from a free preview issue of Cuisine at Home and they don't have the recipe online.  I'll have to type it up soon and post it so everyone can share in the goodness!

Spreading the second layer of custard

I thought it kinda looked like a hamburger at this point

Final chocolate glaze


Quick & Dirty

Changes:
  • Will try to use real vanilla bean in the custard next time (I had a couple but I didn't realize they went bad!  The ones I had were stiff as boards and there was no way I could split them and get the goodness out of them)
  • After making the cakes, I think I should've stored them in airtight containers instead of letting them sit out all day to cool.  I think they may have dried up a bit.
  • I used 8x3 pans instead of 9x2 because that's what I had.  I think it made the cake taller but not a big deal.
Yumminess:
  • The chocolate glaze was amazing
  • Everything...even though this was quite a bit of work I could definitely see myself making it again.  I only got one little piece!
  • The Vanilla-Rum Custard was pretty tasty, I could see making it for other things (maybe some custard filled donuts?)
Sadness:
  • I think fresh vanilla bean really would've helped the custard pop even more
  • Did I mention I only got one piece?!

Tuesday, June 29, 2010

Cinnamon Applesauce + Chocolate Cake = Nummy

I was in the mood for a dense chocolate cake that I could really sink my teeth into and satisfy my sweet tooth without adding a lot more pudginess around the waist so I hit up All Recipes in search of the perfect thing.  I came across this, which didn't sound real appetizing at first (oil cake?) but got pretty good reviews and starts out with a pretty low calorie count at about 200 a piece which isn't bad for a delicious decadent dessert.
Then I read through the reviews and found an interesting an idea - substitute the vegetable oil for a cup of applesauce!  Crunching the numbers as I like to do, adding a cup of oil is almost 2,000 calories whereas a cup of applesauce is around 100.  Which means if the cake is cut up into 24 servings this would save almost 80 calories a piece!  Well, I had some cinnamon applesauce in the fridge so I thought what the heck, let's give it a go.  And the results were fairly amazing...

Quick & Dirty

Changes:
  • Obviously as mentioned above, substituted the cup of vegetable oil for cinnamon applesauce
  • Since we saved all those calories...I didn't feel as guilty breaking up the cake on top of some vanilla ice cream and drizzling caramel sauce on top.  This is definitely the recommended way of eating this cake.
Yumminess:
  • This cake is very dense and has an almost fudgy brownie-like consistency which personally I love
  • I'm sure this recipe would make great cupcakes and the addition of a light frosting would probably elevate it to a whole other level 
  • Another thing to note is the cake is egg-free in case anyone has allergies out there
Sadness:
  • I was greedy and kept this cake all to myself instead of sharing and sadly I didn't make it through the whole thing before it went bad...I definitely learned my lesson there!  
  • I tried making a homemade caramel sauce to drizzle on top but ended up burning it...guess it's not as easy as they make it look on TV

Friday, October 3, 2008

First Birthday Cake

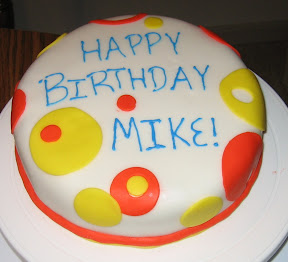
I made my first birthday cake last weekend for my little brother's 21st birthday. I didn't want to try anything too fancy, since it was the first cake my whole family would be seeing and tasting and I think they all had high expectations after seeing pictures and reading about the last one. I love circles and he loves orange so I combined the two and just did an abstract two layer chocolate cake. I think it turned out pretty well! I tried to roll the fondant for the bottom, I wanted to twist the yellow and orange together, but again it didn't go so well. I'm going to have to continue practicing this technique.

One of my coworkers just made her final cake in her classes. It was really tasty! I think I'm going to have eventually get a little professional training so I don't just keep guessing at how things should be done.

Sunday, August 3, 2008

Cake Links

After creating my first cake masterpiece yesterday and not quite getting the masterful results I was hoping for, I decided to search the net a little for helpful hints and inspirations. Here are a few links I think you may enjoy as well:

I would love to trade jobs with her for a day....or a week or month :)
Cake Decorating: Fun with Fondant

For all my fellow fans of Pocky out there:
Pocky Cake!

Saturday, August 2, 2008

Fun with Fondant

I finally got around to trying something I've wanted to do for months: decorate a cake with fondant. Armed only with the experience and training I've received watching Duff on numerous episodes of Ace of Cakes and many cake challenges on the Food Network, I thought I was prepared to venture out on my own. Little did I know it's not as easy as they make it look!

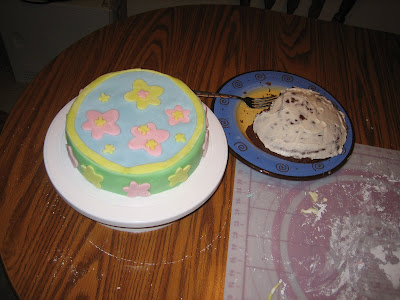
Here's a picture of the final product. As you can tell by the color theme, I had bought most of my supplies back around Easter time. I'm glad I invested in the tools I did and am very excited to go purchase a few more that I learned would've come in pretty handy. This first time around I had to improvise just a titch!


First I made a German Chocolate cake from a box, nothing fancy but definitely tasty. I knew that even if I screwed up the icing and fondant that we should still have an edible cake underneath. I also found out from my realtor that German Chocolate cake is in fact not an old tradition that started in Germany. Doing a little research on my own I found that the recipe was actually created by Samuel German for Baker's chocolate brand. I guess we really do learn something new every day, and I definitely learned a few things during my first trial run!

  • Icing is generally made with confectioner's sugar, not regular sugar
I used a recipe from a friend who makes amazing cakes with super delicious frosting but unfortunately interpreted the sugar ingredient wrong. I should've known that it meant confectioner's sugar because I've made cookie frosting before and know by now that icing is not generally made with regular sugar, but oh well. It's still edible and is definitely a mistake I won't make again.
  • Cakes don't come out of the oven with flat tops
I don't know what I was thinking when I assumed my cake would come out of the oven ready to decorate. I saw cake saws in the store and laughed thinking I wasn't going to need to do any carving. I'm not going to try anything that fancy yet! But this was the only pleasant surprise, as it was actually quite fun cutting the top off and wasn't as hard as I thought it'd be. Of course it didn't come out very level, which I later learned is fairly important at this step in the process. Here's a picture with the cake top that we'll get to enjoy eating before having to cut into the beautiful cake :)


  • Make sure you have enough fondant!
So when I bought some of the supplies months ago, I was thinking I would just make cupcakes or a couple small cakes before trying anything too big. So all I bought for fondant was a four pack of pastel colors, advertised on the box for using to make the accents and decorations, hoping this would be enough to also cover whatever small cake I made. Turns out, it took almost all of two colors to cover the 8" by 3" round cake I made and trying to cover a cake with two or more completely different pieces of fondant is not something an inexperienced decorator should try to accomplish, especially on her first try!
  • Fondant and moisture do not go well together
When I get tense or excited or a lot of other things, my hands tend to get a little sweaty. After discovering I barely had enough fondant to cover the cake, let alone do any decorating, needless to say I started getting a bit stressed out. My hands got warm and wet, which made the fondant almost impossible to work with. I put plastic baggies over my hands to improvise this time, but next time I'll have to try getting some type of gloves to keep the fondant smooth and dry.
  • Have a plan of action before starting
I had gotten flower cookie cutters (or are they technically fondant cutters?) to easily make some shapes to put on my cake. I figured I'd be able to come up with a creative design as I was working and be able to lay out the flowers in a pretty and stylish way. Well with the afore mentioned stress and lack of variety now in fondant after using the blue and green just to cover the cake, I ended up throwing on the flowers mainly just to cover up the seams around the side after poorly piecing the green around it. I had also wanted to try and make balls or long strings to make a border along the bottom, but I found out fondant doesn't shape that easily. Especially after it's been sitting out at room temperature for more than a few minutes or is wet and sticky. Any ideas how to accomplish this would be greatly appreciated!


So it didn't come out looking exactly like a Charm City Cakes creation, but I think it could've been a lot worse. Maybe next time! And if not.....third time is a charm, right? :)