Saturday, June 4, 2016

Strawberry Cream Cheese Rolls


Fun kitchen project on a rainy afternoon!


The results were quite tasty :)

Get the full recipe

Sunday, June 21, 2015

Mo-cake-ah!

What better way to travel back to Disney World than through Brazil?  I guess it may be a little more south than you need to go, but it's worth it to get some mo-cake-ah!  Or as the natives spell it...Mocequa aka Brazilian Fish Stew.  I found this recipe in "A Taste of Epcot" which I picked up while we were in WDW on our honeymoon during the Food and Wine Festival.  Brazil is not a country you can typically find in the World Showcase, but that's the beauty of being there in the fall during the festival because a ton more countries show up to serve you delicious food.

When we were there last fall, I believe we had the Cheese Bread from the Brazilian booth.  I wish they had recipes from everything they served available because that and the Berliner from Germany (a yeast doughnut filled with apricot jam) were amazing and I'd love to recreate them at home.  I'm sure I can find similar things on the internet, but it wouldn't quite be the same.


The mocequa fish stew was pretty good.  I had very high hopes for it with all the colorful ingredients that went in but it came out a little bland.  Maybe I should've added more salt?  But what I thought it really needed was more zip.  The Poblano peppers didn't add very much spice at all.  I'll have to squirt on some rooster sauce into the leftovers to see if that's the kick it's missing.

For the fish I used a combination of tilapia and perch because Cub doesn't carry any of the recommended kinds - snapper, grouper, or mahi mahi.  Where is a good place to buy fish in Minnesota?  If you have a secret spot you should definitely let me know.  And this is one of those times I wish we had some plate-bowls.  You know the kind of plates that have a flat, deep bowl in them?  Yeah my husband didn't either but I swear they exist.  Kind of like this I think...apparently they are called rimmed soup bowls?

The cookbook recommends drinking Brazil's light, refreshing Xingo Black Beer (pronounced "shin-goo") which has hints of chocolate and roasted malts with the stew.  But personally I think I'd rather have my chocolate in some mo' cake...eh?

Saturday, June 20, 2015

East Meets West...Africa!

West African Peanut Curry and Grilled Sweet Corn at Spork
After a nice relaxing vacation and some other big life events, I decided it's time to start cooking and blogging again!  Our vacation also inspired me to want to go on more vacations, but since we can't always be traveling around the globe I decided I could still cook dishes from all over the world.  So I walked over to our local library and picked up three globally inspired cookbooks - Jamie Oliver's Food EscapesCooking Light Global Kitchen, and Mark Bittman's The Best Recipes in the World.  I was in the mood to travel to Africa this weekend after eating some West African Peanut Curry we had in our travels to Bend, OR at a cool little place called Spork (although to our disappointment we did not see any sporks there to eat with).

I decided to begin my journey by checking out one of my favorite cookbooks - Cook's Illustrated's The Best International Recipe.  Flipping through the "Africa and the Middle East" section, I found exactly what I was looking for!

West African Sweet Potato and Peanut Soup

While it wasn't quite the same as the curry, it was pretty tasty.  I went against the advice of the book which says to stick to orange-fleshed varieties of sweet potatoes, otherwise the soup can have an unappealing color.  I bought white ones and I can see what they mean, it was very....drab looking.  But it didn't hurt the flavor at all!

We also needed a little meat in our meal and for that we had to travel all the way to the other coast of the continent.  I flipped through Cooking Light Global Kitchen's "The Middle East and Africa" section and found the perfect pairing to the soup.  That's the only section I've browsed, but so far I'm LOVING the beautiful pictures in it.  While I really like Cook's Illustrated writing style and advice from the Test Kitchen, I really do wish they had more pictures.  That's also the reason I refuse to get Kindle versions of cookbooks because drooling over all the delicious food is my favorite part of cookbooks.  It helps with the experience of wanting to travel to the different parts of the world as well.

East African Braised Chicken

This one I changed up a little bit.  Instead of doing the different chicken pieces, I only did thighs.  Also, instead of opening a bottle of wine just to use 1/2 a cup, I decided to dump in a bottle of beer....because, why not?  While it was braising, I checked online to see if anyone had reviewed it and sure enough, it gets rave reviews! As of today there are 13 5-star reviews which is pretty darn good.  We liked it a lot too.  The sweetness of the raisins and dates were a great combination with the slight spiciness and other Indian inspired flavors. I was a little afraid I'd ruin it with the beer, but I couldn't tell the difference!  Sometime I'd like to do a braising test with water, chicken broth, wine and beer and see if the liquid makes a difference at all.  Maybe I just have a poor palate though, who knows.

All in all it's been a successful journey so far.  Tomorrow night we plan on traveling across the ocean to Brazil so stay tuned!

Sunday, February 24, 2013

Build-A-Font Workshop

My dreams have finally come true!  That's right, today I created my very own fonts.  It was so easy and fun, I might just make some more tonight!  I'm very thankful that the makers of iFontMaker decided to make a Windows 8 version of their app.  I was seriously contemplating getting an iPad just so I could use it.

What better way to show off my cool new fonts than on some of my delicious food pictures?  On the left is a font I called "SkinnySnowmen" featured on a bowl of Spicy Southwest Pumpkin Soup I made last fall.  I made the soup for my brother and his girlfriend when they came to town to visit, and it was a big hit!
And on the right we have my new font called "Snowmen" on a plate of crispy, flaky catfish that I made while the boyfriend was away.  It was the first time I'd used my little deep fryer in a while, and it was a huge success.  I couldn't believe how great the fish turned out.  My favorite part though was the dipping sauce.  It was a great spicy alternative to tartar sauce.

Obviously I have snowmen on the brain today.  My house is still full of them...I think there are about a dozen of them staring at me right now while I type this.  And we got way more than enough snow the last few days to go make a real live Frosty, but instead I stayed inside creating these cool fonts.  I hope they push out some updates to the app as I think it could be even better.  The main thing I noticed is that it seems to only create fixed width fonts.  You'll notice that the i's take up the same amount of room as the w's and m's, which I'm not a huge fan of.  It makes the words too spaced out.  But I have faith that they'll fix that and some other things, hopefully soon!

Monday, July 4, 2011

First Trip Down Whoopie Pie Lane

Okay readers, everyone turn to page 108 of Baked Explorations. Today's lesson will be on the classic American dessert - whoopie pies. What's that you say? You don't own your own copy of Baked Explorations yet? You haven't even picked up the Brooklyn Boys' first edition of Baked?! And you have never had a whoopie pie??? *Gasp* Actually wait...I've never had a whoopie pie either. I'm not sure how you can go around calling something a classic American dessert when I doubt many Minnesotans have ever had one let alone made their own from scratch. I definitely think they are more of a fad with foodies right now than a timeless classic. Between their two books Matt and Renato actually have three versions - Pumpkin with Cream Cheese, Chocolate, and Red Velvet. Oh and within the Chocolate recipe they have a variation on the filling for peanut butter. There must be something to these little pie/cookie/cake wonders so I decided to start with the basic chocolate and see how I liked it. After tasting an extra half with some Swiss Vanilla Filling I have already reached a conclusion - I think I'm going to open my very own Whoopie Pie Shoppe! ;)

Chocolate "cookie" halves with blobs of cream filling

These took a while to put together so I'm glad I had all afternoon to spend on them.  Maybe I should take every Monday off to test out new recipes...I'm sure I could get a lot of my coworkers to back that idea.  First you have to mix up the dough/batter for the cookie/cake halves.  The recipe calls for 1/2 cup hot coffee and I found out when making cupcakes a while ago that my taste for flavored coffee actually comes in quite handy in this situation.  I brewed up a fresh pot of White Chocolate Obsession and I think it really adds to the depth of flavor.


After plopping on big blobs of cream I smoothed them out with my handy dandy little spatula.  Then I smooshed down the tops and wrapped up each one.  Matt (or Renato) says this recipe yields 10-17 pies depending if you go with the large Pennsylvania Dutch size or the smaller normal person size.  As I was scooping the batter onto my baking sheets I thought I had a lot - three sheets of 6 and another of 3, that's 21!  And then it hit me...that's 21 *halves*...apparently I went for Pennsylvania Large.  But that's okay with me.

I wonder if I can convince my coworkers to cut them in half tomorrow and spread the Whoopie Pie Love...

I also wonder if Baked #3 will have a boozy version of these delicious little pies or if I'm going to have to come up with one on my own?

Friday, June 24, 2011

Cake Final Exam

I needed an inspiration for my final cake design.  I wasn't really feeling the example designs out of our instruction book, they were a little too old-school for me.  I actually had a birthday to bake for that Monday, but I didn't want to give him a cake a day late.  And I already had a different inspiration for a treat for him (which turned out very yummy btw).  So I was really excited when I found out one of my friends at work was going to find out the gender of thing growing inside of her the Friday before.  Now we don't have to call it a thing anymore!  It's going to be a beautiful bouncing baby boy.  I spent some time over the weekend coming up with this design and was pretty nervous about how well I was going to be able to execute it at class because I wanted it to be perfect for her.

The first part of class we practiced writing and making Wilton roses.  Writing actually turned out to be kinda fun and easy.  The first time I tried it on my leftover cookies I was missing a very important trick - add a bit of piping gel to your frosting to help make it smoother and easier to squeeze.  It was fun but a little tricky practicing on the practice board because I'm not used to writing in cursive at all!  For some reason it felt fairly natural when writing in frosting though.  I'm definitely not as scared of it as I was before and no long *quite* as impressed with the beautiful writing I see on the standard cakes at every grocery store.  The roses were also pretty cute and easy as soon as you know the behind-the-scenes secrets.  After learning each step the mystery was revealed and I soon had my first frosting rose!  I wish I had a picture of it.  It definitely wasn't perfect but what rose in nature is?  It looked real with all it's little imperfections!  I need to make some more practice ones soon before I forget the technique.  Anybody want a cake full of random roses? :)

Finally it was on to the main event - implementing the design on my cake that I literally dreamed about the night before.  I had brought with a printout of the outline of my design and tried the technique we had learned the first week with using piping gel to transfer it on to the cake.  Unfortunately this was just full of fail.  I couldn't see the lines at all.  I think if I try this again at home I'll try coloring the gel slightly so it stands out better.  But I forged ahead - freehand!  I thought for sure I was doomed.  Who thought it would be a good idea to try to freehand multiple perfect circles and straight lines?  I don't think I did too bad...

My final - I passed! :)

I wasn't super happy with the writing, but the rattle turned out pretty cute.  The picture below is before I added the yellow dots for a finishing touch...I definitely didn't decide to do them to cover up any imperfections there may have been in the white icing.  No no, not at all.


The colors came out so cute!  I had a really hard time with the brown and wanted to give up more than once.  I started with "brown" but it was very very light and not what I wanted at all.  So I added a bit of black to darken it up but that gave it a charcoal gray affect.  I added some red to brighten it up which did absolutely nothing.  Finally I poured in red, blue and green and mixed vigorously and to my surprise I got the perfect dark chocolate brown that I was looking for!  Not too shabby for my second cake and first original design. 

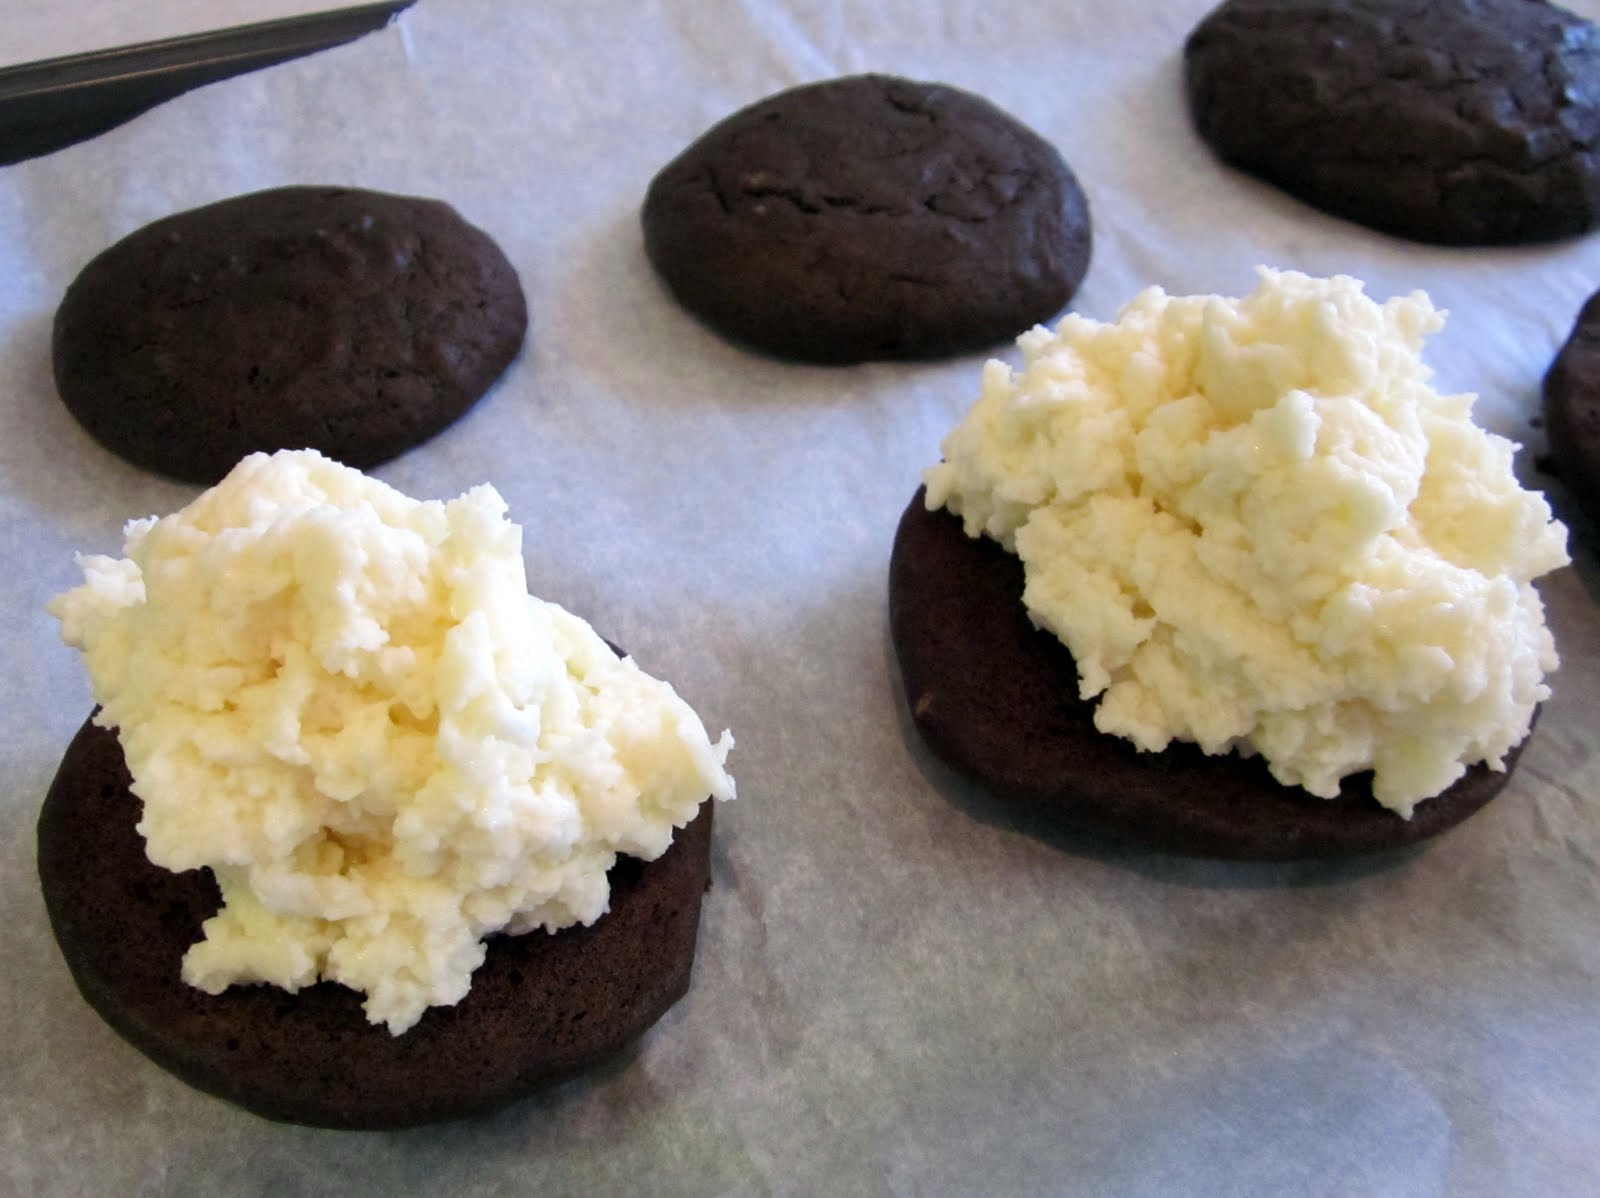
I tried to do the same border I wanted to do on my first cake.  The first round I plopped onto the cake turned out terrible so I finally asked the instructor for help.  She showed me on my practice board and then I was like oh yeah...the practice board!  I did a few lines for practice and then wiped off the mess I made before.  I could never quite get it exactly like I wanted, but it turned out wayyyy better than the first time!


Oh and my coworkers loved it.  Everyone took a moment to admire it before letting anyone cut in :)

Saturday, June 4, 2011

Frosting to Cupcake Ratio 1:1

Our third week of class we were to bring 6 cupcakes and green icing for leaves, light blue and dark blue for pompom flowers (which sadly I have no pictures of), and a flower color of our choice. I made a bright yellow which you can beautifully piped on the top of this cupcake.  We actually made a lot of different flowers that night, but this one came out so nicely that I didn't want to ruin it with random flowers.

First we practiced drop flowers, which are made with a big star tip and rotating your hand about 90 degrees while squeezing out the icing.  These actually frustrated all of us because they left a big hole in the middle and didn't turn out like the picture on our practice boards.  The turning motion got tiring after a while too.  You're supposed to go back and put a dot of another color in the center, but I never did that since we were just practicing.  Next up were rosettes, which turned out to be one of my favorites.  They were really easy and I thought looked really good as a border.  I tried doing both drop flowers and rosettes on top of one of my cupcakes.


Unfortunately, as you can probably tell as soon as I put my lid on my box to take my cupcakes home I smooshed the frosting down so my pretty pretty flowers got flattened.  I was fairly devastated.  But not as devestated as I would have been if my frosting hadn't stayed inside it's container when it crashed to the floor earlier that night!  It's very hard working with so many unfamiliar things in such a confined space.  At least that night I had decided to scoot down a seat so my friend and I were actually taking up two spots since our class wasn't full.  It was nice finally getting my mis en place in order.  After the rosettes we moved on to shell borders, which are a lot harder than they look.  I never really could get it down.  Apparently it's the same technique I was supposed to use when doing the border on my cake - if only we had covered it last week!

Not in love with the "flower" but the leaf turned out pretty!

Then we moved on to pompom flowers which I loved making.  If you want to see a perfect one click here.  Mine were pretty close to the same colors but not quite that perfectly shaped.  Definitely something that was fun to practice though.  Next came leaves which are surprisingly easy - the leaf tip does all the hard work for you.  Last but not least was the shaggy mum that you can see pictured above.  When I brought these into work the next day, everybody said those looked more like Cookie Monster on a bad hair day than any type of flower.  I agree...not my favorite out of the bunch.  Unless you want an excuse to pile on a mountain of frosting.  And yes - there are certainly times that I do!